
Fashion illustration is akin to painting for artists, mathematicians’ equations, and doctors’ medicine. It allows the fashion designer to communicate their vision directly to the viewer. Fashion illustration is generally considered the first step toward making a design idea come alive and will enable designers to take their concepts from imagination onto paper or fabric visualizations.
Fashion sketches vs. fashion illustrations

There is no one-size-fits-all notion of fashion. After all, fashion is a kind of self-expression. And, just as each individual is unique, so is their distinctive style. However, several broad phrases are used to define many styles of fashion.
For example, “Fashion Illustration” refers to fashion garments and accessories sketches. “Illustration” technically refers to “an image illustrating books and newspapers.”
Before photography took over the fashion industry, fashion drawings were used in-store catalogs to display available clothes styles and were known as “fashion illustrations.” Although the phrases “fashion illustration,” “fashion sketching,” and “fashion drawing” are frequently used interchangeably in today’s fashion world, there is a distinction.
“Fashion Illustration” refers to a picture or image’s function, whereas “Fashion Drawing” specifies the characteristics of a genre of illustration. Fashion Illustrations can contain any visual associated with fashion, such as fashion drawings, sketches, photographs, and so on.
So next time you try to figure out what someone means when they say “fashion illustration,” just remember that it’s simply a sketch or drawing of a garment or accessory.
How to draw fashion sketches
When sketching a basic, flat fashion sketch, the methods following are straightforward.
Step 1: Sketch down the outline of your outfit.
The first step in creating your own garments is to decide on the shape or silhouette of the piece. Do you want something fitted or oversized?
This is a critical option since it will affect the overall appearance and feel of the garment. You may start drawing the design once you’ve settled on the form. This is where you will begin to put your vision into action.
Remember to consider the details, such as pockets, buttons, and trim. The more research you do at this stage, the easier it will be to bring your garment to life.
Step 2: Add design details
Let’s be honest, without design details, a garment is just a piece of fabric. It’s the design details that make a garment an actual garment. Details like functional and decorative seams, volume-inducing pleats and frills, fastenings like buttons and zips, and any other information from necklines, collars, and pockets to stitch details like embroidery – are what make a garment a garment.
Adding these design details gives the viewer a better understanding of how the final product will look. Without them, it’s just a piece of fabric. And who wants to wear a piece of fabric? No one.
So make sure to add some design details to your garments to make them actual garments. Otherwise, you’ll be stuck walking around in a piece of fabric. And no one wants that.

Step 3: Refine the sketch
As any artist knows, a sketch is often just the beginning of the creative process. Once the initial lines are down on paper, it’s time to start refining the image, adding details and shading to bring the drawing to life.
However, before you get too carried away with the finer points, it’s essential to take a step back and evaluate the overall composition. Are any unwanted lines or stray marks distracting from the main image? If so, it’s time to eliminate the eraser and get rid of them.
If you spend a few minutes straightening up your work, you’ll have a cleaner, more polished drawing ready to be transformed into a masterpiece.
How to draw fashion illustrations
Fashion illustration is an essential skill for designers looking to communicate their ideas. This guide will teach you how to construct a 9-head figure, design garments for that figure, and render those designs with the correct textile, texture, and print.
Gather materials.
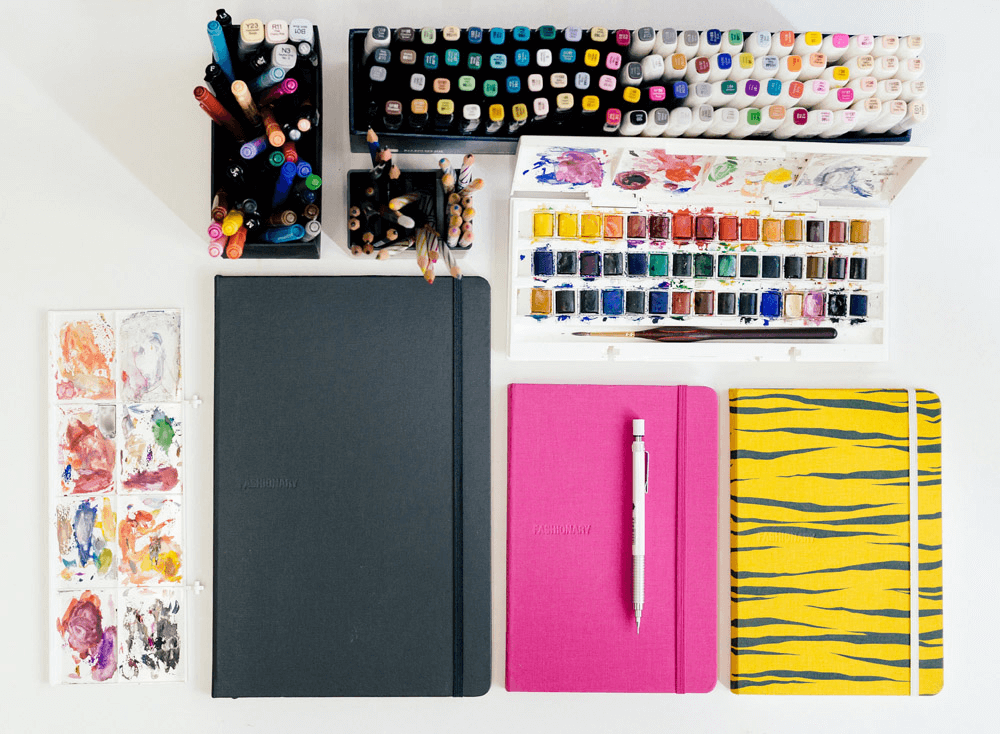
You must get a good quality H pencil if you’re serious about sketching. Not only will the marks be light and easy to erase, but they won’t indent the paper. This is important if you want to add color to your sketch later on.
Trust me, I’ve tried using other pencils, and it just doesn’t work out. You also need a good quality eraser and some thick paper. Otherwise, your sketch will probably just look like a bunch of scribbles. However, with the correct resources, you may make some great sketches that will wow everyone!
Consider alternate methods for creating a croquis.

If you’re not into drawing or just don’t have the time for it, consider creating a croquis by tracing around a real person. This will require someone willing to hold still for a few minutes while you trace them, but it’s a quick and easy way to get a decent croquis. Just be sure to use light pencil strokes so you can easily erase any lines you don’t need later on.
Another option is to find a photo of a model in the pose you want and use that as your croquis. This works best if you can find a front, back, and side view of the same model to see how the clothing hangs on them from all angles. Once you’ve found your photo, print it out or trace it onto paper so you can start sketching your designs.
If you want to get creative, you can create 3D croquis using mannequins or dolls. This is a great option to try draping fabric on your croquis or playing around with different poses. You can also find small mannequins at most craft stores if you don’t have dolls around the house.
Decide on a pose for your croquis.
There are many different ways to pose your croquis, but as a beginner, you might want to start with the most popular and classic pose: a runway sketch showing a model walking or striding on a runway. This is probably the easiest to draw and will allow you to illustrate all of your designs in full view. Plus, it’s always fun to imagine yourself as a fashion model strutting your stuff down the runway!
But if that’s not your thing, don’t worry – there are plenty of other options. You could show the model sitting, bending, or in any different position that you think will show off your designs best. So experiment until you find a pose that works for you.
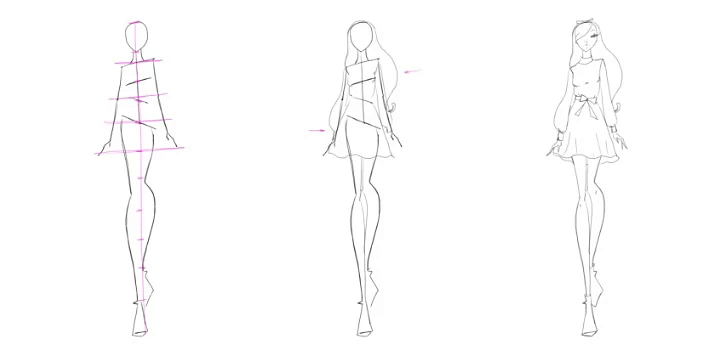
Draw the balance line for a Croquis.
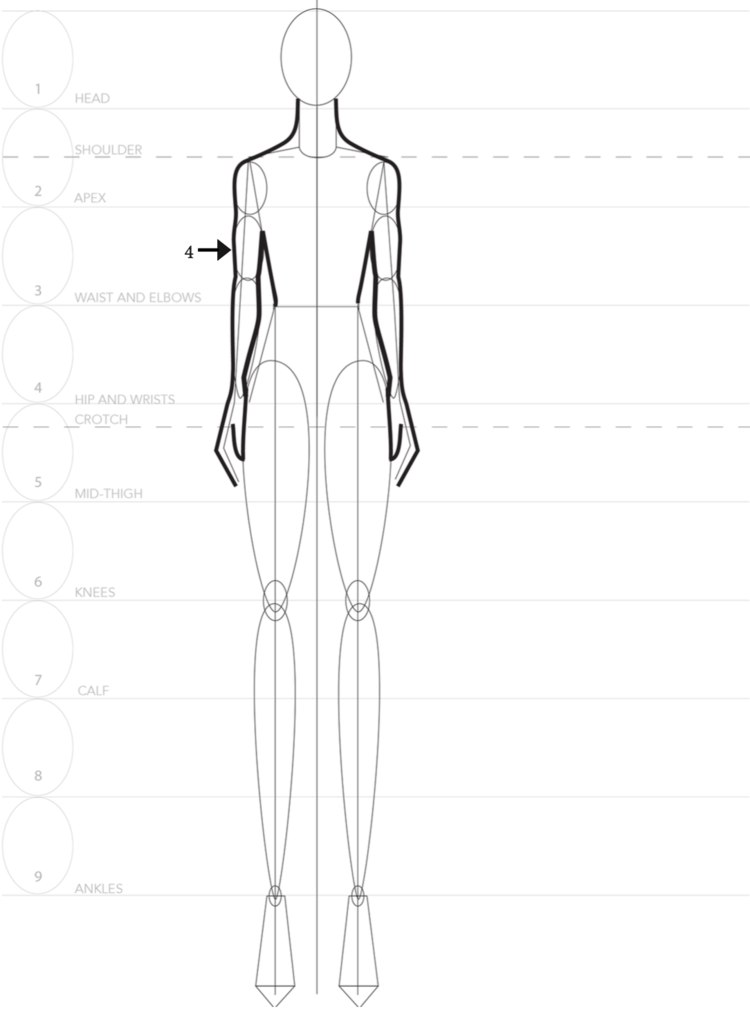
A Croquis is a skeletal outline of a figure used by fashion designers to sketch the basic proportions of a garment. “Croquis” comes from the French word for “sketch.” A Croquis typically features a head, neck, shoulders, pelvis, and legs.
To draw the balance line for a Croquis, start at the top of the head and draw a line down to the tip of the toes, along the backbone.
Then, draw an oval to represent the head. The oval will be the base of your croquis; from this, you can begin sketching the basic proportions of a garment.
Start drawing the pelvic area first for a Croquis.
When it comes to drawing a Croquis, there are a few things you need to keep in mind. First, you’ll want to start with the pelvic area. On the balancing line, directly below the midpoint, where the pelvis is naturally positioned on the body, draw a rectangle with equal side lengths. Size the square to the width you want your model to be.
A plus-sized model would have a larger square width than a slimmer one. Once you’ve got the basic outline of the pelvis down, you can start adding in the details. For instance, you might want to add curves to make the hips look more feminine. Or, if you’re going for a more masculine look, you might want to make the square look more angular.
Whatever details you choose to add, just make sure that the overall shape of the pelvis is maintained. Otherwise, your croquis will look less than realistic.
Draw the torso and shoulders.

When drawing the torso of a human figure, it’s important to get the proportions right. The torso should stretch upwards from the pelvic square, bending at the waist and expanding out at the shoulder. The shoulders, like the hips or the top of the pelvic box, should be the same breadth.
To make the torso look realistic, it’s important to draw the lines smoothly and without sharp angles. Otherwise, your figure will look more like a cartoon character than a real person. With a little practice, you’ll get the hang of it in no time.
Sketch the neck and head.
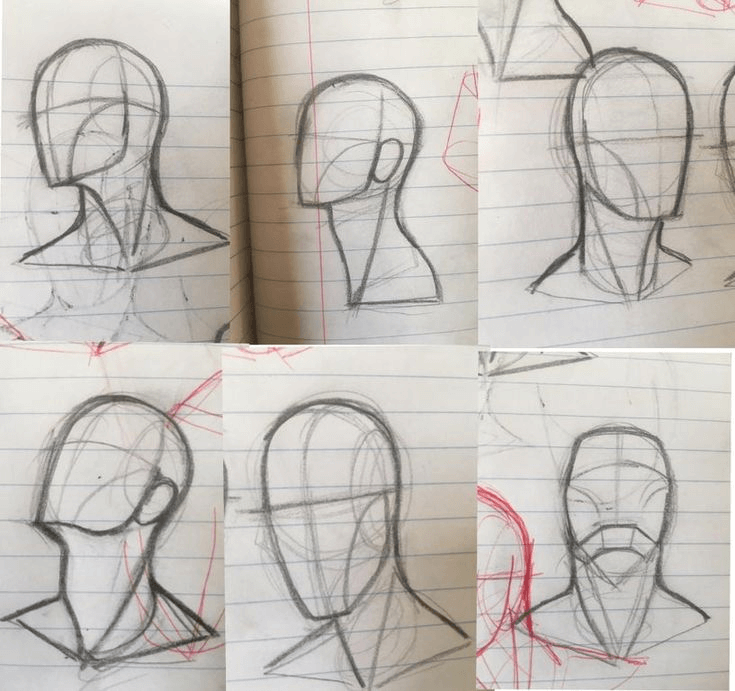
When sketching a neck and head, one must first consider the proportions of the shoulder and length ahead. The neck should be a third the width of the shoulder and half the length ahead.
After taking these measurements, start drawing in the head, which should be proportional to the body. The model appears more childish or younger with a larger head.
Fill in the legs.
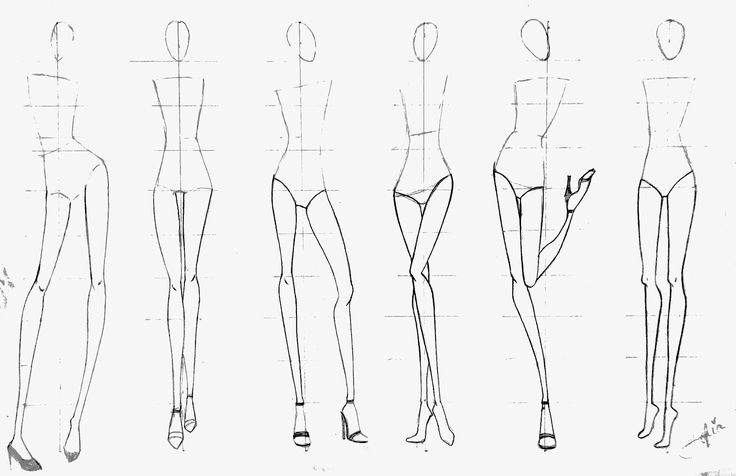
It’s critical to get the proportions perfect while sketching a croquis. The legs should be the body’s longest section, roughly the length of four heads. They are also commonly separated into two sections: The thighs are the area from the bottom of the pelvic box to the top of the knees, while the calves lie between the bottom of the knees and the beginning of the ankles.
Fashion illustrators generally make the model’s legs longer than her body to enhance her height. This makes the clothes look more dramatic and conveys a sense of movement or action. So when you’re drawing your croquis, remember to give her some long, shapely legs!
Finish with the feet and arms.

The feet are relatively narrow, so they should be drawn like elongated triangles about the same length as the head. The arms should be constructed like the legs, tapered toward the wrists.
They should be longer in proportion to the torso than a real person’s arms would be since this gives a more stylized impression. The hands and fingers should be added last.
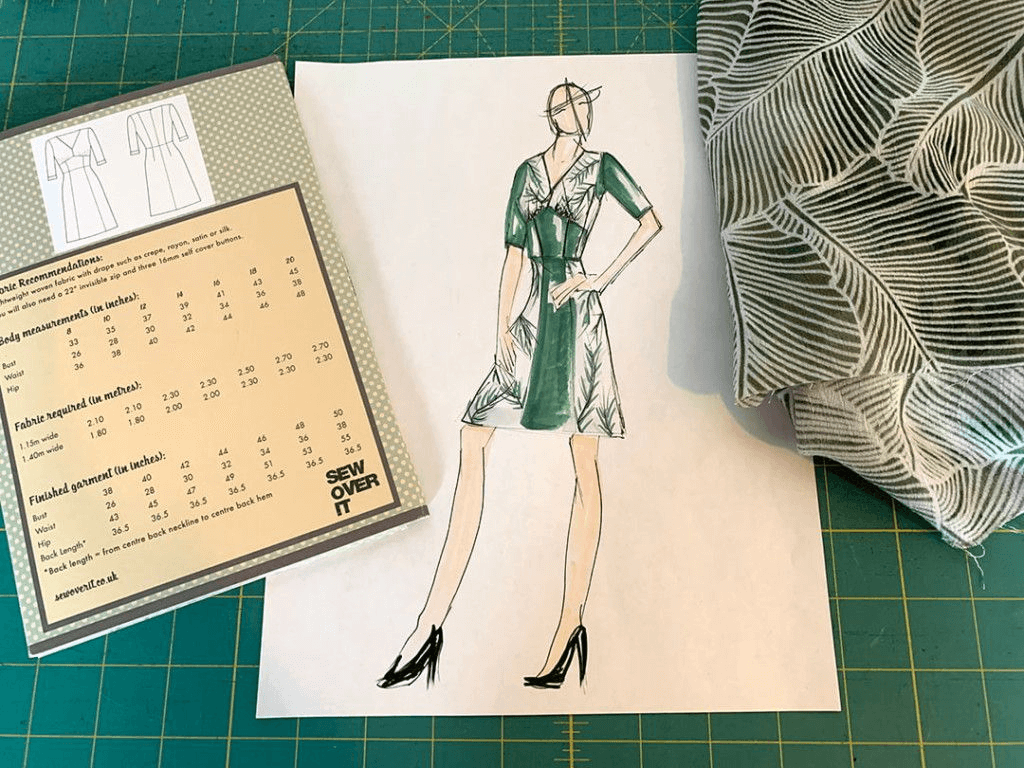
Illustrate your original design for Clothes and Accessories.
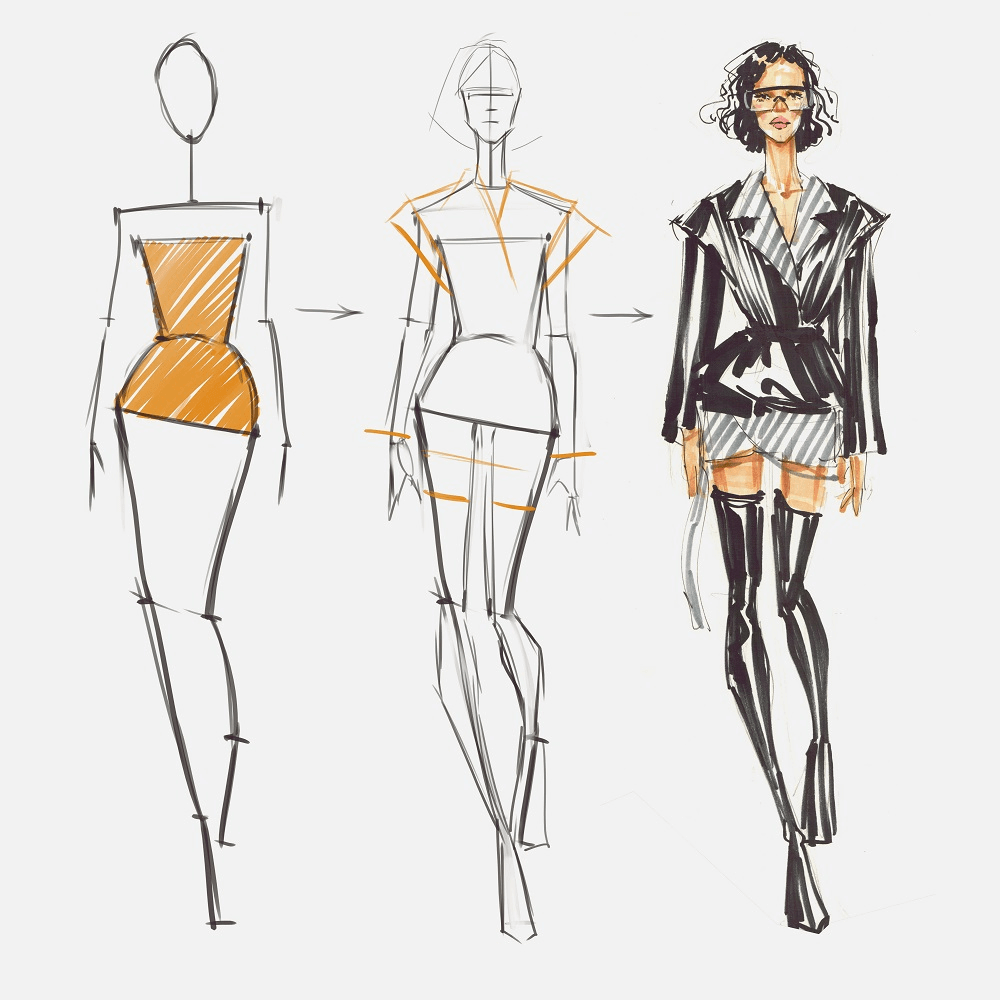
Creating a stunning fashion design is all about attention to detail. Consider the overall aesthetic you want to achieve, then add all of the minor touches that will bring your idea to life. For example, if you’re designing a dress, add patterns, ruffles, text, bows, and other elements that will make your piece unique.
And don’t forget accessories! The right accessories can really complete the look you’re going for. If you need inspiration, simply do a quick online search or flip through some magazines to see what’s currently in style. You may make a true one-of-a-kind fashion design with a little ingenuity and attention to detail.
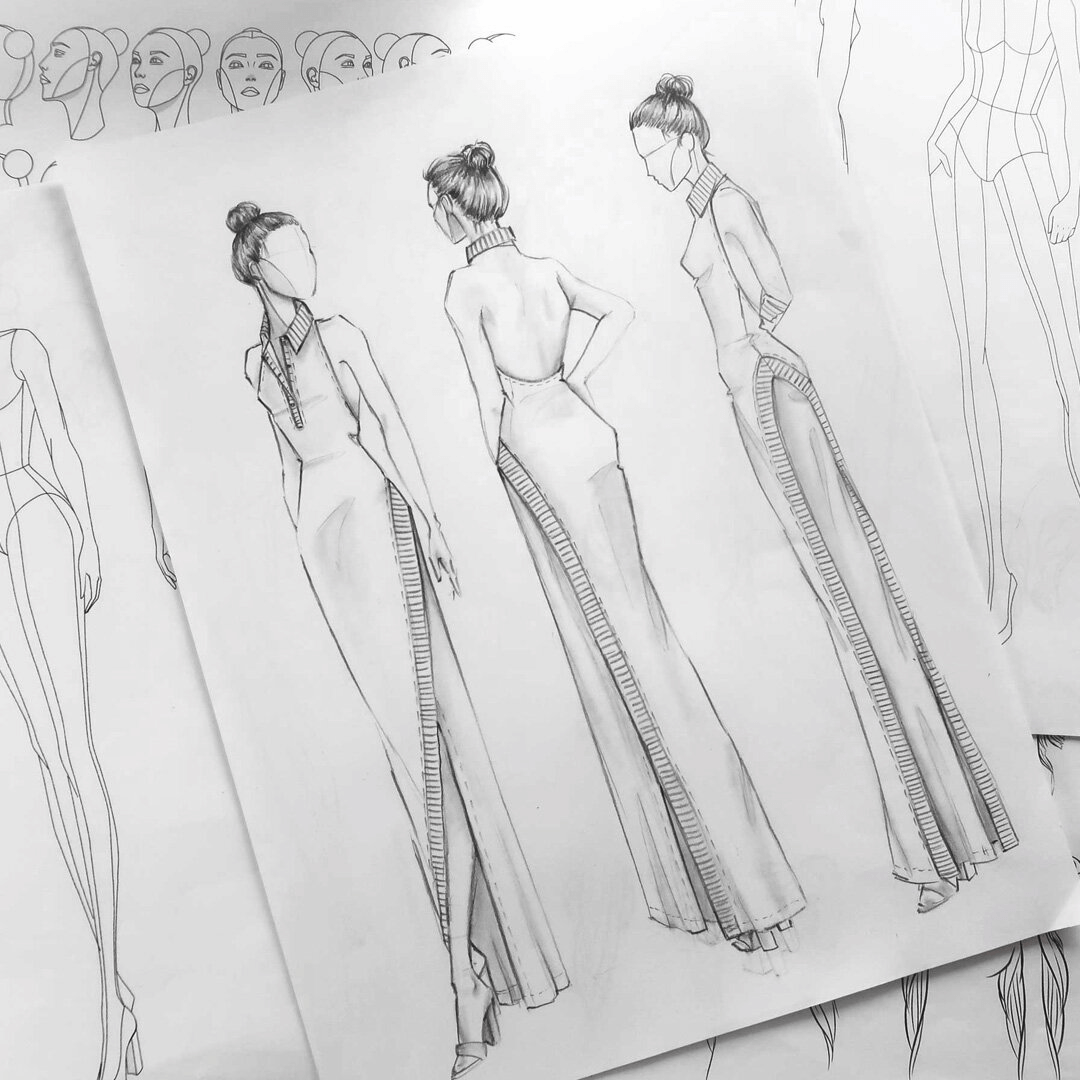
Sketch the clothes boldly.
Regarding fashion illustration, the clothes are just as important as the model. After all, the purpose of a fashion drawing is to showcase your design ideas. As such, it’s important to use a bolder hand when sketching the clothing.
The clothes should appear to hang on the croquis realistically, with creases around the elbows and at the waist and near the shoulders, ankles, and wrists. Pay attention to how the clothing hangs on a person and replicate that in your drawing. By taking the time to get the details right, you’ll create a fashion illustration that truly captures your vision.
Discover how to create folds, wrinkles, and pleats.
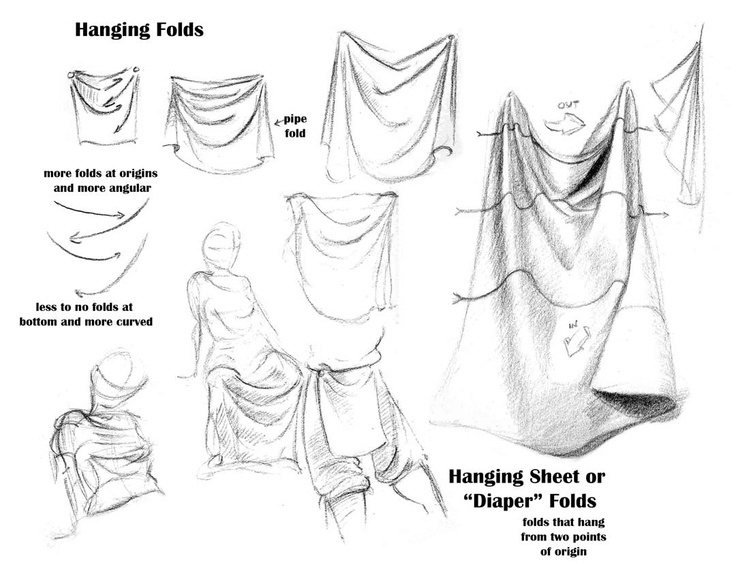
Being able to replicate folds, wrinkles, and creases in your drawings is crucial when it comes to creating believable clothing. This can be achieved by using different lines to create different creases in the fabric. For instance, light, wispy lines can be used to depict folds caused by gentle movements, while heavier, more abrupt lines can convey wrinkles made by sharper creases.
By learning how to draw these various types of folds, you’ll be able to create more realistic and accurate illustrations of clothing. This will help you better communicate the structure of the garments you’re trying to depict.
Illustrate patterns and prints.
Before you begin designing a garment made from a patterned or printed fabric, it’s important to take the time to accurately illustrate how the fabric will look on a model. One way to do this is to start by outlining the garment, such as a skirt or blouse.
Next, divide it into a grid with different sections. Then, fill in the sections one at a time with the pattern on the fabric. This will allow you to see how the finished garment will look and make any necessary modifications to your design. You can ensure that your patterned apparel turns out just how you want it with a little planning.
Shade, ink, and color the drawing to completion.
Shading is an integral part of any drawing, as it helps to create depth and dimension. When adding shading to a figure drawing, it’s important to use light and dark values to create the illusion of form.
Using thick black ink or paint will help to create a stark contrast that will make your lines pop. In terms of clothes, be sure to choose colors that complement the skin tone of your figure. care-ealy adds shadows and highlights to give the fabric some texture and interest.
Consider making flats. Illustrate patterns and prints.
A flat is a fashion illustration of a garment as it would look if it were lying on a flat surface. It differs from other fashion illustrations because it does not show the garment as it would look on a person’s body. Instead, it shows the outline of the garment on a flat surface. This can be helpful for people viewing the design to see the flat version and how it would look modelled on a body.
Flats are also sometimes called line drawings or croquis. To create a flat, start by drawing the garment’s outline on paper. Then, fill in details such as seams, buttonholes, and pockets. You can also add shading to give the flat more dimension. Once you have created your flat, you can use it to make a fashion illustration or add it to a portfolio.
Hope this article is helpful for you in a new industry. Want to build your own clothing line? Let’s talk today! As a Chinese garment factory with nearly 20 years of experience, I am sure we can make some great products together!